The Xero Import tool allows you to quickly connect your Xero company to PlanGuru, bringing in your chart of accounts, historical data, and actuals to begin forecasting immediately.
PlanGuru’s new Xero Online Import offers improved mapping, automatic daily sync, and new filtering options — allowing you to import:
-
An entire Xero company or multiple companies
-
Or filter data by Tracking ID
This import creates a complete data foundation for your forecasting scenario by automatically pulling balance sheet and income statement accounts from Xero.
When to Use This Method
Use the Xero Import when you want to:
-
Connect PlanGuru directly to your Xero account.
-
Import historical financials and chart of accounts automatically.
-
Maintain synchronized data for budgeting, forecasting, and reporting.
-
Save time by avoiding manual Excel imports or data entry.
Getting Started
Step 1 – Access the Import Menu
-
In PlanGuru, go to the left navigation.
-
Select Import → Financial Statements.
-
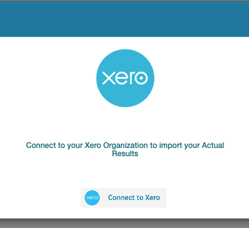
Under Xero, click the Connect to Xero button.

Step 2 – Connect to Xero
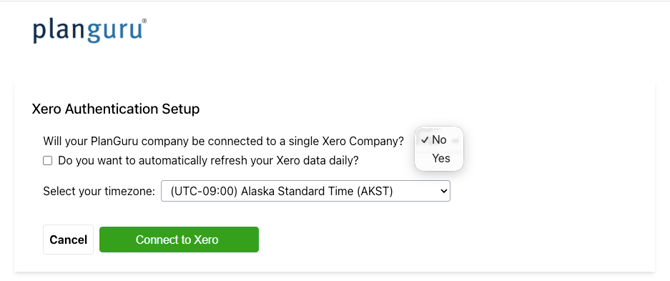
You’ll now set up your Xero connection.
If this is your first import for the PlanGuru company:
-
No active connections will appear.
-
Click Connect to Xero.
You’ll be asked:
-
“Will your PlanGuru company be connected to a single Xero company?” → Select Yes (if only one company) or No (if you're planning on importing from multiple companies)
-
“Automatically refresh Xero data daily?” → Choose Yes or No (you can enable later if desired).
Then click Connect to Xero to open the Xero login window.
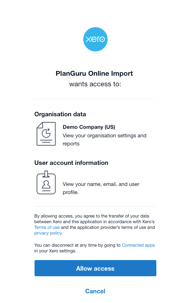
Step 3 – Log In and Select Xero Company
-
Log in to your Xero account.
-
Choose the specific Xero company you want to import from.
-
Click Allow Access to proceed.
Step 4 – Configure Import Options
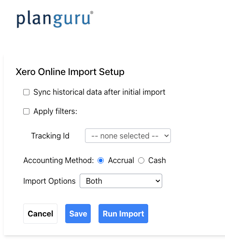
After logging in, you’ll arrive at the Import Options screen.
Here you can decide how to import your data:
-
By Tracking ID
-
Or Entire Company (default)
Make your selections, then click Run Import.
Running the Import
Once you click Run Import, PlanGuru begins communicating with Xero and automatically retrieves your data.
During the import, you’ll see a status notifications showing progress.
You don’t need to take any further action until it completes.
When finished, PlanGuru automatically takes you back to the PlanGuru mapping screen.
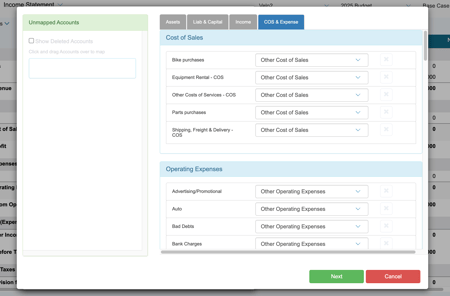
Mapping Accounts
On the Mapping Screen, you’ll see:
-
All accounts detected from Xero.
-
Their corresponding locations within PlanGuru’s Balance Sheet and Income Statement. Usually, PlanGuru maintains the correct Xero order automatically
PLEASE NOTE: Due to Xero's categorization, please go to Liab & Capital and under Capital, change the account type for Retained Earnings from Capital to Retained Earnings
Once everything looks correct, click Next to continue
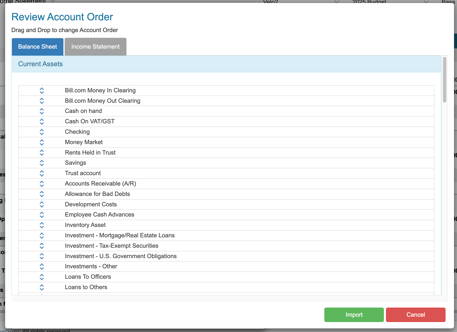
On the next Review Account Order screen you can reorder any accounts if necessary by clicking and dragging the account to the appropriate place.
After confirming account mappings:
-
Click Import.
-
PlanGuru will finish loading the data and create your scenario.
This process may take a few moments depending on the size of your Xero company.
Reviewing the Imported Scenario
Once the import is complete, you’ll see your new scenario with all imported accounts and data populated.
-
Historical financial data will appear for prior periods.
-
Active accounts are created automatically in the Balance Sheet and Income Statement.
-
You can now begin budgeting, forecasting, and reporting.
💡 Tip:
If your Xero company includes Tracking IDs, consider running multiple imports into different scenarios to model different business units separately.