Where are you installing PlanGuru?
Desktop Install Instructions | Network Server Install Instructions
Installing PlanGuru on your Desktop
To install PlanGuru on your local machine, simply use the link provided in your invoice and download the installer on to the desired machine. Then run the installer. By default PlanGuru installs to this location: C:\Program Files (x86)\PlanGuru LLC (or C:\Program Files\PlanGuru LLC depending on if your machine is 32 or 64 bit).
When the installer finishes you should be all set run the program. Simply start PlanGuru and enter your activation credentials. By default PlanGuru will save your analysis files created within the program to this location: C:\Users\Public\Documents\PlanGuru. This can be changed if you so desire by starting the program and navigating to File>Firm Information>Change Data File Path.
Installing PlanGuru on a Network Server
To facilitate this process, we recommend that you have your network administrator install the software. If you encounter any issues, please submit a Help Desk ticket at https://help.planguru.com/knowledge/kb-tickets/new – this will ensure the fastest turn around for you.
You will need the product licensing information included when you purchased in order to activate PlanGuru once it is installed. The following information will assist with installation:
On the Network Server
1. If possible, the software should be installed at the server (as opposed to installing from a workstation to the server).
2. You will need administrative privileges to perform the installation.
3. PlanGuru must be installed to the server’s C drive. Installing to another drive such as the D drive will create issues when running the application.
4. PlanGuru installs files to 2 locations on your server:
a. The program and configuration files are installed to \Program Files (x86)\PlanGuru LLC\PlanGuruS
b. The firm and company data files are installed to a PlanGuru subfolder in the public documents folder; by default, \Users\Public\Documents\PlanGuru\.
5. Once the software has been installed on the server, you will need to complete the set up as follows:
a. Make sure both folders created during installation (see item 4) are Shared with Read/Write permissions.
b. Using Windows Explorer, navigate to the application folder and make sure a file named NWConfig.xml has been created. PlanGuru creates this file during installation; however, on occasion the server permissions don’t allow the file to be created automatically. If you don’t see the file, you can create it manually by executing a file in the same folder named NetConfig.exe.
6. Unless you intend to run PlanGuru on the server, there is no need to execute and license the software on the server. If you want to execute PlanGuru on the server to test the installation, you can activate a network seat on the server and deactivate it when testing is complete. To deactivate a license, start PlanGuru and then select Help | Deactivate License.
Connecting to individual Workstations
1. The easiest way to access the software and data from each workstation is to map a network drive to each location in item 4 above. For example, network drive P: can be mapped to the application folder and network drive Q: can be mapped to the shared documents folder. The network drives you map must be the same on each workstation that wants access to PlanGuru.
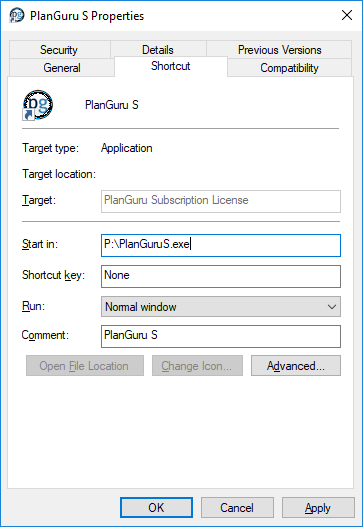
2. Add a shortcut to the desktop of each workstation to provide access to PlanGuru on the server. The target will be the network drive and the file name to execute PlanGuru. For example, if drive P: is mapped to the PlanGuru application folder, the target will be P:\PlanGuruvS.exe
3. The first time you execute PlanGuru from every workstation, you will be asked to license the software. Each workstation must be licensed using the same license ID and password you received when you purchased the software.
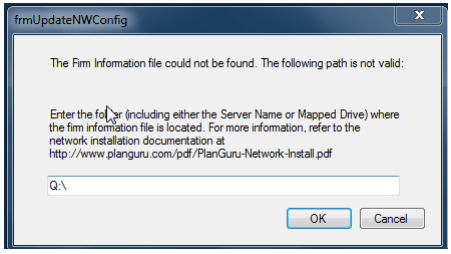
4. In addition, the first time you run PlanGuru from the first workstation, you will be prompted for the location of the firm information files. Assuming you’ve mapped a network drive to the PlanGuru shared documents folder, you will enter that drive here. For example, if you mapped drive Q, you will enter Q:\ and press OK to update the network configuration file. This will update the file for all workstations.
5. The final step to completing installation is to update PlanGuru to look for your company files in the correct location. When you run PlanGuru for the first time, you are asked to add a new company or to open an existing company. Exit this window without selecting either option. Select Other Options | Firm Information. Use the Browse button to navigate to the Q drive you set up for the firm data files. Highlight the Q drive and click on OK. Click on Other Options | Open to view a window to select a company and analysis to open. Initially you will only see Sample Company; however, once you add your company and analyses, they will also appear here.
Issues that may arise during or after network installation
1. PlanGuru Network Edition will not operate properly in evaluation mode. Evaluation mode is only available as a machine license. If you try to operate PlanGuru on your network in evaluation mode, you will likely receive an error message on the workstations stating that PlanGuru cannot locate your firm information file. You will need to license the software on the workstation with your PlanGuru license ID and password. You can move a license from one workstation to another at any time by deactivating it on one workstation (using the Help menu selection) and then activating it on another workstation.
2. After network installation and licensing, you may receive this message:
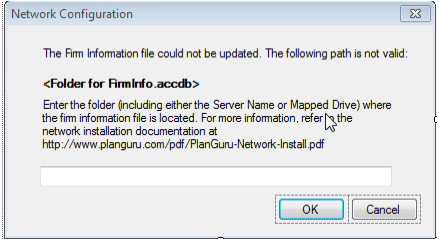
This message normally appears when PlanGuru either cannot locate the firm information file from your workstation using the path shown on the screen or can locate the file but can’t update it. If the path you see onscreen is not the correct one to allow the workstations access to the PlanGuru firm data files, you can change it in the space provided. If the path is correct, it’s likely that the workstation does not have the permissions it needs to read and update the firm information file or the PlanGuru data folder is not shared.
3. If you encounter the screen from step 2 and have entered the new path, you may see the following window:
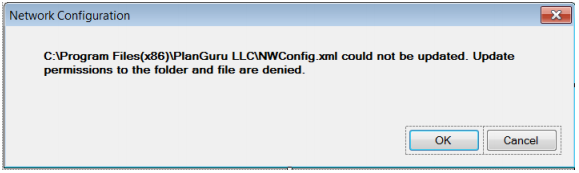
Make sure the user has the appropriate permissions to read and write to the PlanGuru folder to update NWConfig.xml. If you need additional information about setting and viewing permissions, log a ticket at the PlanGuru Help Desk to get assistance.
Alternate Network Install Configuration:
Alternate Install:
If you are using QuickBooks Enterprise Edition and want to import from QuickBooks to PlanGuru, you may have to set up PlanGuru differently. The standard QuickBooks Enterprise setup is to store the data on a server, and have the application installed locally on workstations. For PlanGuru to import from QuickBooks, it has to be installed in the same way. PlanGuru and QuickBooks must be installed on the same physical computers.
- Download and install PlanGuru on each workstation that will need access to the application.
- Start PlanGuru and navigate to Utilities | Firm Information and then use the Browse button to point the local install of PlanGuru to the appropriate PlanGuru data folder on the server.