Installation
After purchasing a PlanGuru Desktop Plan and running the installer, the add-in will already be installed on your machine. The only thing you need to do from is point Excel to where the add-in resides. If for whatever reason PlanGuru is installed, but the add-in isn't, you can download it here: https://www.planguru.com/ftpupdates/pgrptaddin6sub.exe
Activating the Excel Add-in
1. Open Excel and click the “Office” or the “File” button in the top left-hand corner of the application. Next, click the "Options" button, and select "Add-ins" on the left side and click "Go" to Manage Excel Add-ins.
Use the browse menu to locate and select the “pgreports v6.1.xlam” file and click the “OK” button. By default it should be in the following location: C:\Program Files (x86)\PlanGuru LLC\Advanced Reporting
2. With the new Pgreports v6 selected, close and restart Excel to load the add-in.
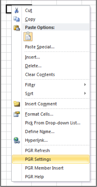
3. Confirm successful installation right clicking on any cell within the Excel workbook, you should see a number of custom menu options including “PGR Refresh”, “PGR Settings”, “PGR Member Insert” & “PGR Help”
4. Once you've installed the Advanced Reporting Add-In you're ready to begin building your own custom reports using this tool. For more help using the ARA please see this knowledge base post: https://help.planguru.com/knowledge/pgr-help-manual-using-the-advanced-reporting-add-in