1. The first step is to "point" Excel to the add-in file. Open Excel and click the “Office” or the “File” button in the top left-hand corner of the application. Next, click the "Options" button, and select "Add-ins" on the left side and click "Go" to Manage Excel Add-ins.
Use the browse menu to locate C:\Program Files (x86)\PlanGuru LLC\Advanced Reporting then select the “pgreports v6.1.xlam” file and click the “OK” button.
2. With the new Pgreports v6 selected, close and restart Excel to load the add-in.
3. Confirm successful installation right clicking on any cell within the Excel workbook, you should see a number of custom menu options including “PGR Refresh”, “PGR Settings”, “PGR Member Insert” & “PGR Help”
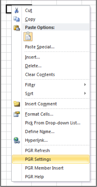
If these menu items don’t show up, navigate back to the screen shown in step 8 and confirm that the ‘Pgreports v6’ is shown within the “Add Ins” window and the checkbox to the left of it is checked.
4. Once you've installed the Advanced Reporting Add-In you're ready to begin building your own custom reports using this tool. For more help using the ARA please see this knowledge base post: https://planguru.zendesk.com/entries/23682332-PGR-Help-Manual-Using-the-Advanced-Reporting-Add-In